
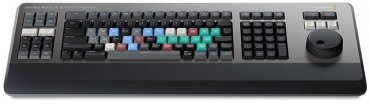
The Blackmagic DaVinci Resolve Speed Editor Keyboard makes professional editors' jobs much easier by speeding up every step. You can easily connect the keyboard to your computer via Bluetooth or USB-C port.
Details
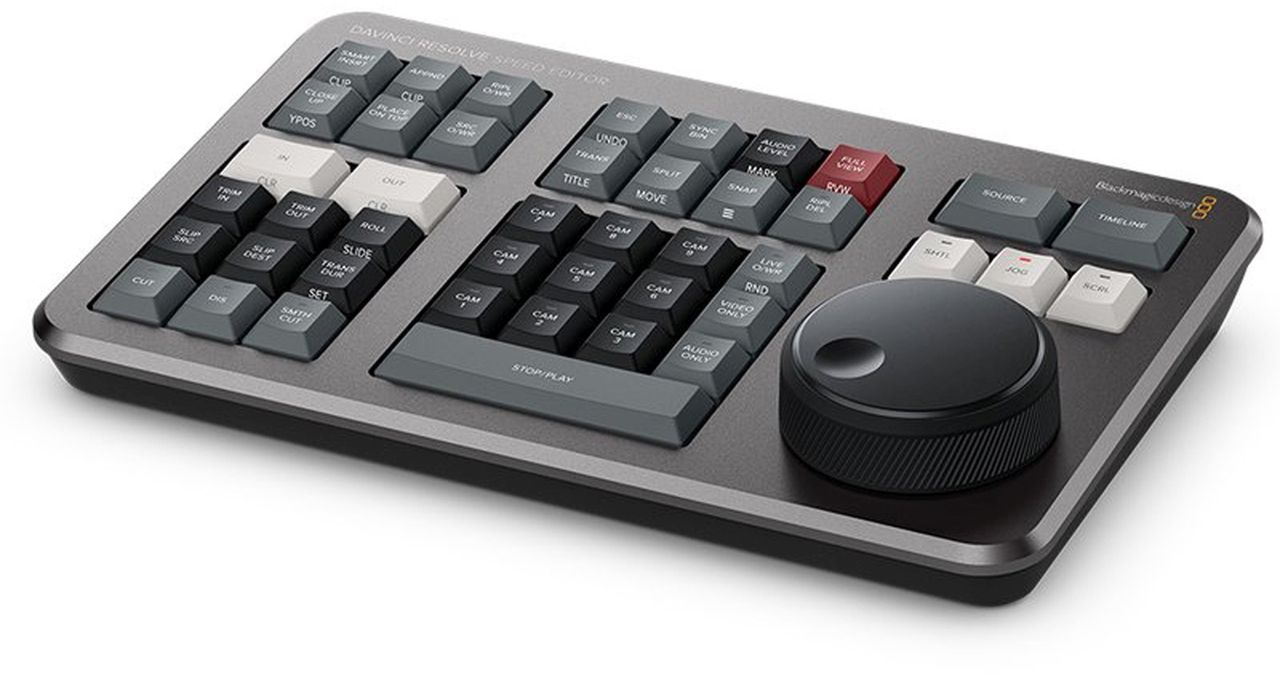
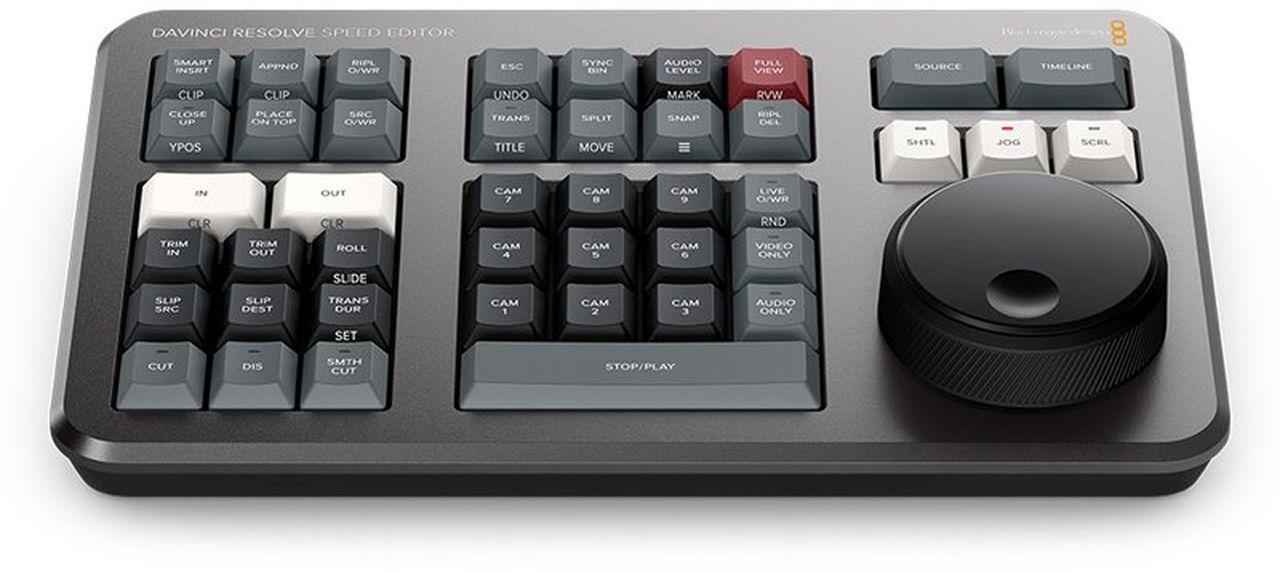
Blackmagic DaVinci Resolve Speed Editor Keyboard
The DaVinci Resolve Speed Editor Keyboard is aimed at professional editors who need to work faster to complete time-sensitive projects. With dedicated keys and a high-quality jog/shuttle controller, this keyboard is faster than a mouse. Simply connect the DaVinci Resolve Speed Editor Keyboard to a computer's USB-C port and you're ready to go.
DaVinci Resolve keyboards are designed to work alongside the Cut workspace to significantly speed up editing. Haptic controls to get your hands on make for a much more pleasant user experience than if you were merely editing in the software. Unlike a mouse, the metal, soft-rubber-covered seek slider lets you accurately seek and set edit points in the timeline. It almost feels like you're holding the timeline in your hand. Together with the trim buttons, the large seek slider is used for live trimming. And because it works so precisely, it's naturally faster. The seek slider gives you a whole new way of working when cutting and trimming! Specifically, DaVinci Resolve delivers next-generation editing.
The design of the DaVinci Resolve Speed Editor houses only the editing-specific buttons. The seek slider is made of metal. For wireless connectivity, the keyboard has Bluetooth and an internal battery. Alternatively, you can connect it via USB-C. Overall, it is more portable than any standard keyboard!
Control via search slider
The DaVinci Resolve keyboards give you a higher quality editing experience because they give you more proximity to the editing process through physical contact than a simple computer mouse. Because of its weighting, you can turn the metal seeker knob very quickly to move nimbly back and forth in the timeline. But the seek slider offers even more possibilities, because it can also be used for live trimming. When one of the trim buttons is pressed, it turns into a large adjustment knob for precise trimming in real time. Once you've trimmed with the seek slider, you'll never want to go back to the mouse.
Transport keys
Hardware controls are ideal for nimbly controlling playback. Start and stop playback in a flash with the "space bar," which is placed so you can press it with your thumb. Use the Shuttle, Jog, and Scroll buttons to change the mode of the seeker to cut not only faster, but more accurately.
Source Tape for scrolling through clips
In traditional editing software, you work with thousands of clips that you're constantly clicking and dragging back and forth as you edit. For projects like commercials, news, promos, and training videos, this is too time-consuming. The original tape-based linear edit had the advantage that you could see all the media as you played back the settings from the videotape and easily fast-forward or rewind. Now, in the Cut workspace, there is a modern variant of videotape called Source-Tape mode. Simply press the "Source" button and use the seek slider to scroll through all your media. As you do so, the current clip is highlighted directly live in the bin. After executing a cut, the viewer stays in source tape mode so you can move on to the next shot faster.
Set In and Out points on the fly
The most frequently performed operation when cutting is the input of In and Out points. That's why there are large In and Out buttons on the Speed Editor keyboard that you can find without looking. For ambidextrous cutting, this is ideal because you can use your right hand to operate the transport keys and your left to set In and Out points and make cuts. Simply scroll with the seek slider and place In and Out points at any location. Once the In and Out points are set, simply extend your fingers to the cut function keys to execute the cut. The In and Out points are also used to zoom in on the source tape. Afterwards, if you want to return from the source tape view to the full bin, press the Escape key.
Intelligent cutting modes via keyboard
Cutting with a keyboard is different from cutting with a mouse. For this reason, the Cut workspace has been upgraded to take full advantage of keyboard speed. The intelligent cut functions use a so-called "Smart Indicator" in the Timeline to automatically insert cuts. In most cases, this saves you from having to set In and Out points in the Timeline to execute a cut. The cut buttons are located directly above the In and Out buttons and are easy to feel. Best of all: In the Cut workspace, you don't waste time switching to the Timeline every time you cut. You stay in the source tape, browse it visually, and place clips continuously. It's much faster because you can just drop clips into the Timeline as you go.
Smart Insert
The "Smart Insert" button works much like the classic insert function for a cut in software. However, it's a bit more clever because you don't have to go into the Timeline to set an In point. Smart Insert locates the nearest edit marker in the Timeline and inserts the clip at that point.
Append at End
Append at End is a great way to build movie edits, and it's fast. Simply select an In and Out point in the clip, press the Append button, and the clip is inserted at the end of the Timeline. The Append at End feature is great for inserting shots from chronologically recorded footage.
Ripple Overwrite
The frequently used Ripple Overwrite edit function lets you replace settings in a flash. It replaces a clip in the Timeline with a selected clip. If that clip is longer or shorter, it is fitted into the Timeline in place of the existing clip, affecting the overall length of the Timeline.
Close Up
Close Up is a great way to create different two-camera perspectives with one camera. Simply film your subject as a wide shot or a semi-close up. Then use the "Close up" button to create a slightly zoomed-in version of this camera shot and place it at the top of the Timeline.
Place on Top
"Place on Top is similar to classic editing functions. The edit mode places a clip in the Timeline on the layer above an existing background layer. If there is no layer above the background layer in the Timeline, a keystroke inserts a new Timeline track into the Timeline and places the clip in it.
Source Overwrite
For multicam shoots with synchronized timecode, Source Overwrite lets you browse settings and insert intermediate clips into your timeline. The mode automatically matches the timecode of clips to that of the timeline and inserts the clip synchronously in the track above it. An easier alternative to multicam editing!
Live trimming via seek slider
Use the high-quality, keyboard-integrated large seek slider to trim settings with precision. The handy size of the slider also adds a new dimension to the trimming experience. It's faster, too, because the trim buttons turn the slider into a trimming tool. Simply hold down one of the trim buttons and turn the knob. While you select different trim modes with your left hand, you can make fine adjustments with your right. It's extremely fast, and the smart indicator in the Timeline shows you exactly which edit point you're trimming. Simply navigate through the Timeline while trimming live cuts. A whole new way of working!
Trim In
Use the Trim In button to adjust the In point of the clip, which is located in the Timeline to the right of the transition marked with the smart indicator. In a single clip, on the other hand, this button moves the In point of the clip. All adjustments affect the overall length of the Timeline like a ripple effect.
Trim Out
The Trim Out button adjusts the Out point of the clip, which is located in the Timeline to the left of the transition marked with the Smart indicator. In a single clip, on the other hand, this button moves the Out point of the clip. All adjustments affect the overall length of the Timeline like a ripple effect.
Roll
The Roll button does the same thing as a mouse click on the transition point. However, thanks to the seek slider, adjustments can be made with frame precision. This works by rolling the transition point forward or backward. Pressing twice switches the key function to "Slide". This has no effect on the length of the timeline.
Slip Source
The Slip Source button affects the clip to the left of the cut mark. It moves the setting back and forth within the In and Out points of the current clip in the Timeline. Because Slip Source moves a clip in the same time frame, the overall length of the Timeline is unaffected.
Slip Destination
The Slip Destination button affects the clip to the right of the cut mark. It moves the setting back and forth within the In and Out points of the current clip in the Timeline. Because Slip Destination moves a clip in the same time frame, the overall length of the timeline is unaffected.
Transition Duration
One of the most popular functions in trimming is the transition duration. The Trans Dur button adjusts the duration of an effect at the edit mark. When this function is selected, turning the seek knob live changes the length of the transition. Pressing the Transition Duration key twice sets a default length for the transition.
Quickly insert and remove effects
Inserting transitions on crop marks can be time-consuming in software because you have to click and drag each effect into the timeline individually. But with the DaVinci Resolve Speed Editor keyboard, you can turn effects on and off at the touch of a button. This way, effects are added or removed in a snap as you scroll through the Timeline. The Smart Indicator in the Timeline shows you exactly which edit point is involved. You can also zoom in on the Timeline to get a closer look at cut points. The "Cut" button removes all effects from a cut mark in the Timeline. The Dissolve button applies a standard-length dissolve to an edit point. The "Smooth Cut" key is used for smooth transitions to smooth out image jumps.
Function keys
DaVinci Resolve Speed Editor scores with a smaller, more mobile keyboard instead of the large QWERTY keyboard. That's why the Function Keys block explicitly provides only settings needed for editing. Some of these keys for advanced functions are not even available on the full-blown editor keyboard. Moreover, some keys have a second function that you activate by holding down a key or pressing it twice. So the portable design still gives you plenty of editing power with fewer keys. To help you find the keys you need blindly and work faster than with regular keyboards, the keys are grouped into separate blocks.
Cancel and Undo
The Escape key is easily located in the top left corner, as it is the most common key for undoing some operations. A great example is the sync-bin function. When you select a camera, pressing the Escape key takes you back to the multi-view. When pressed twice, the key works like Undo.
Sync Bin
The Sync Bin function is a new type of multicam view. It allows you to find settings synchronized with the current setting in the timeline. In this way, you find intermediate cuts using a familiar multiview interface. You then use the camera buttons to select an alternate setting, and Source Overwrite to insert it into the Timeline.
Audio level and markers
The Audio Level button lets you quickly set audio levels for your clips. Swipe the button and make adjustments with the seek slider. It's faster than ever to set audio levels while editing! Press the button twice to set markers, then press and hold to specify the color for the marker.
Viewer with full screen mode
The "Full View" button is red, so you can find it right away and activate the full screen mode for your viewer. This is especially great for showing off your edit to clients. Pressing the "Full View" button twice activates full screen mode and starts playback just before the last cut you made.
Add transitions
The "Transition" button is similar to the "Cut" and "Smooth Cut" buttons. However, it inserts a custom transition of your choice from the DaVinci Resolve Transition palette. Press and hold the Transition button to display the palette and make your selection.
Split and move
The "Split" button places a cut in the Timeline immediately at the current playhead of the clip. If the playhead is at a split point in a clip, pressing the Split button removes it. While holding down the button, you can use the seek slider to move the current clip back and forth in the Timeline.
Snap function and viewer size
Pressing the Snap button magnetically docks clips to existing clips as they are inserted into the Timeline. On the Speed Editor keyboard, this operation is non-magnetic and therefore more discreet. When jogging, it is only briefly indicated at the edit points, which makes it more convenient to use. While holding down the key, you can use the seek slider to adjust the size of the viewer.
Ripple Delete
"Ripple Delete" removes the clip from the current playhead and moves up the timeline so that the deleted clip leaves no Lücke. Empty spaces in the timeline are closed in this way. In combination with the "Split" button, you remove unwanted sections from settings this way. It also reduces the length of your timeline.
Selecting multiple cameras with Sync Bin
The camera numbers block is used to select cameras when using the Sync Bin function in the Cut workspace. When you press a camera button and simultaneously press the seek slider, the images from the selected camera are displayed in real time in the Timeline as you scroll forward. This function is called "Live Override". On the Speed Editor keyboard, you can perform this operation immediately by holding down the camera key or pressing the "Live Override" key. When "Live Override" is activated, the keys light up so that you can select the cameras just like on a production mixer. At the same time, you'll see a multiscreen view and can cut back and forth between cameras. For even more control over editing, there are even "video only" and "audio only" buttons in this block.
Bluetooth and USB control
Bluetooth is built into the DaVinci Resolve Speed Editor model. So you can use the keyboard without tangled cables and even together with your normal computer keyboard. This is optimal for use with a laptop. If required, the keyboard can also be connected via USB. The USB port is used to charge the internal battery at the same time. Bluetooth and the built-in battery offer you maximum mobility with this keyboard!
- Connection: USB Type C
- Updates and configuration: 1 USB Type C port for software control and updates.
- Power consumption: 4 watts max.
- Operating temperature: 0-40 °C
- Storage temperature: -20-60 °C
- Relative humidity: 0%-90% non-condensing


Simply subscribe and benefit as a newsletter recipient every week: